
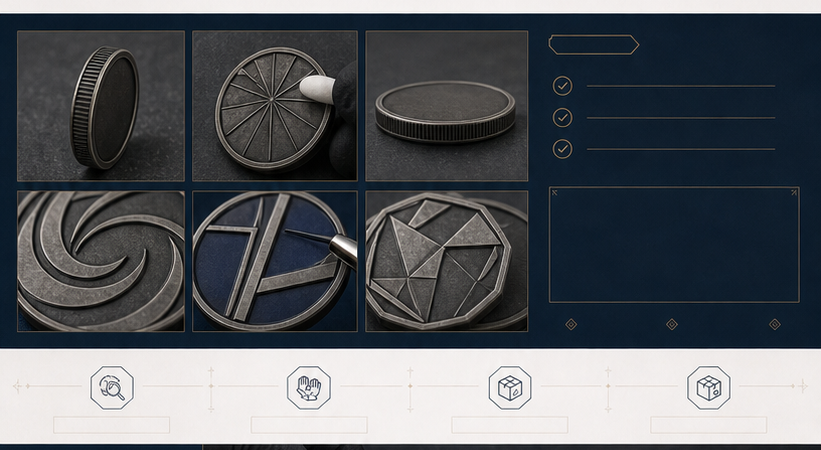
A metal plating specification turns a general color request into a production reference. Words such as gold, silver, black, copper, or antique can describe different visual directions, and the final appearance also depends on the base metal, relief, polishing, recessed areas, enamel, engraving, lighting, and packaging. This guide helps brands, schools, clubs, retailers, and wholesale buyers prepare a usable plating brief for custom coins, badges, pins, medals, keychains, and related Zincustomized projects.
Start with the product purpose
The plating decision should begin with how the product will be used and seen. A formal recognition coin may need a restrained silver or antique gold direction. A retail keychain may need a finish that matches an existing collection. A school or club badge may prioritize readable relief and brand colors over a highly reflective surface. A promotional item may need a cost-conscious combination that still preserves the logo hierarchy.
Write the purpose, audience, product type, intended handling, presentation method, and expected quantity before choosing the finish. This gives the manufacturer a reason for the surface direction instead of treating a color word as a complete specification.
Define the base material first
Plating is a surface route applied to a selected metal product; it does not replace the need to specify the base. Zinc alloy can support shaped relief and dimensional silhouettes. Stainless steel may suit a thinner or cleaner metal direction. Copper or other base materials may be considered for particular artwork and finishing plans. The product geometry and surface preparation affect the result.
A plating quote should identify the base material, product size, thickness, relief, edge, and quantity. Two products with the same gold label may look different if one has a polished raised surface and the other has antique recessed detail. Review the full construction, not the color name alone.
Compare polished and antique directions
Polished plating usually creates a brighter, more reflective appearance on suitable raised areas. Antique treatment can add contrast by darkening or emphasizing recessed detail, borders, and textures. Neither direction is universally better. The correct choice depends on artwork, product purpose, amount of relief, packaging, and how the item will be viewed.
For a detailed coin, antique treatment may help the main relief read more clearly. For a clean logo tag, polished silver or gold may support a simpler visual language. Ask to see the finish applied to a comparable design rather than selecting from a generic swatch.
Gold plating specification
Gold can mean a bright yellow-metal direction, a softer tone, or an antique gold contrast. State whether the intended appearance is polished, brushed, antique, or combined with another surface. Identify whether gold should cover the full product, only high points, or a defined area.
If gold is part of a brand collection, save the approved sample, reference image, finish wording, and artwork version. A repeat order should still be reviewed because changes in size, relief, enamel, or base preparation can change how the gold surface is perceived.
Silver plating specification
Silver may be selected for a clean, neutral, formal, or industrial direction. Polished silver can reflect surrounding light, while antique silver may provide deeper contrast in recessed areas. Brushed or textured effects create a different surface from a mirror-like polish.
Explain whether silver is the main visual surface or a contrast around enamel and raised relief. Mark any areas that must remain bright, dark, matte, or textured. This is more useful than writing only “silver finish” on a purchase order.
Black and copper directions
Black plating can create a bold background for raised metal, bright enamel, or a simple emblem. Copper can add warmth and may suit vintage, industrial, or heritage-inspired projects. Both should be reviewed with the artwork because color contrast changes across relief, engraving, and recessed fields.
Specify whether black or copper should be polished, antique, brushed, or used as a selective contrast. Include photos or references only as direction and identify which visual elements are fixed. The final decision should be recorded on the approved proof or sample.
Coordinate plating with relief and engraving
Raised and recessed areas receive light differently. Polishing may emphasize high points, while an antique treatment may darken recesses. Engraving can become more or less visible depending on surface contrast. Enamel borders also interact with plating, especially when color fields are small.
Review the actual front, back, and edge artwork with the chosen finish. If the smallest text is important, check it at the final physical size. A finish should support the information hierarchy rather than hide the logo, date, or recognition message.
Use color references carefully
A screen display, photograph, or printed swatch can communicate a direction but cannot perfectly represent a physical plated surface under every light. Photography, monitor settings, reflections, and surrounding colors influence perception. Use a reference to start the discussion, then confirm the intended surface through a proof or sample when appearance is important.
For a collection, store the approved finish name, sample reference, artwork, product dimensions, and packaging. This creates a more reliable reorder record than a color name copied from an old email.
Include plating in the quote comparison
Ask every supplier to price the same base metal, size, thickness, relief, edge, plating direction, enamel, engraving, quantity, sample scope, packaging, inspection, and delivery assumption. Confirm whether surface preparation, selective finishing, and sampling are included.
A lower unit price may exclude a special antique treatment, polishing step, color field, sample, or packaging requirement. Compare total project cost and the physical specification together. This is especially important for small quantities where tooling and setup can have a larger effect.
Plan quality checks around the finish
A useful inspection reference may include overall color direction, plating coverage, visible defects, relief clarity, polishing, antique contrast, enamel boundaries, engraving, edge condition, and packaging protection. The checklist should match the approved sample and product purpose.
Do not use vague language such as “make it nice” as the only quality standard. Record the approved artwork, finish, sample, quantity, packaging, and any agreed acceptable variation. Zincustomized can discuss the practical checklist as part of the quote and production review.
How Zincustomized supports plating decisions
Zincustomized reviews zinc alloy, stainless steel, copper, plating, polishing, antique treatment, enamel, engraving, relief, packaging, and related custom metal routes. The confirmed finish depends on the product brief, artwork, dimensions, quantity, and target presentation. We do not invent certifications, customer statistics, or guaranteed visual outcomes.
Start with the metal plating color options guide, use the quote request page, or contact Zincustomized on WhatsApp.
Frequently asked questions
What is the difference between polished and antique plating?
Polished plating is generally brighter and more reflective, while antique treatment is used to create more contrast in recessed detail. The actual result depends on the base, relief, artwork, and surface preparation.
Should I send a color sample?
Yes, a reference can help communicate direction, but a proof or physical sample is more useful when the finish is critical.
What should a plating quote include?
Specify base material, dimensions, relief, edge, finish direction, enamel, quantity, packaging, destination, and target date.
Use a finish approval checklist
Before the finish is approved, check the product name, base material, dimensions, thickness, relief, edge, plating direction, polishing, antique contrast, enamel, engraving, and packaging. Confirm which surfaces should remain bright, dark, matte, or textured. Review the front, back, and edge rather than approving a single cropped image. If a color is critical to the brand, identify whether the reference is a physical sample, a production reference, or a screen image.
For repeat orders, keep the final proof, approved sample, artwork version, quantity, and finish wording in one project folder. When the next product has a different relief or size, do not assume the old finish will look identical. Ask the supplier to review the new surface and confirm whether the previous reference remains suitable. A written record helps purchasing, design, and production discuss the same expectation.
How to write a plating specification a factory can use
A plating request should describe more than a color name. “Gold,” “silver,” or “black” can refer to different visual references, and the final appearance is also influenced by polishing, recess contrast, enamel, relief, photography, and lighting. A useful specification identifies the base metal, the areas that should remain bright or antique, the treatment for raised and recessed details, and the reference image or sample that the production team should follow.
Separate appearance requirements from performance expectations. If the item is mainly displayed or presented at an award event, the visual match may be the primary concern. If it will be worn, handled frequently, or packed against other metal items, discuss surface protection, contact points, and realistic wear expectations. No finish should be described as permanently unchanged in every environment; handling, abrasion, moisture, chemicals, and storage all influence appearance over time.
A practical finish approval checklist
- Confirm the base metal and the desired polished, matte, brushed, or antique direction.
- Mark which surfaces receive plating and which areas remain recessed or enamel-filled.
- Provide a physical reference or a clearly lit finish image when color matching matters.
- Review the finish on the actual relief and edge profile, not only on a flat color swatch.
- Approve a sample or production proof before authorizing the full quantity.
For multi-finish designs, label the front, reverse, edge, and any special areas separately. This is especially useful for challenge coins with a bright rim, medals with an antique center, or badges that combine metal and enamel. Include the required quantity and delivery country because packaging, freight, and project timing may affect the complete quotation.
Zincustomized coordinates artwork proofing, die casting, polishing, plating, color filling, inspection, and packing through its manufacturing workflow. Buyers can compare the available custom metal plating and finishes with the detailed plating color options guide, then request a custom metal product quote using the approved specification.